
How can you create a JavaScript library?
With the npm software registry, you can also contribute to the open source community.
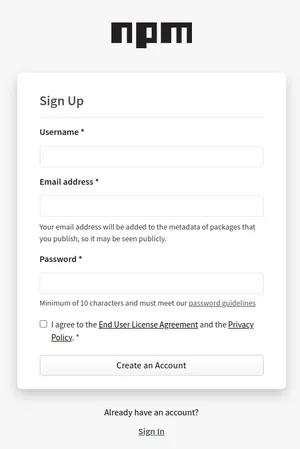
Create an account at the npm registry
- Go to npm signup and create a new account
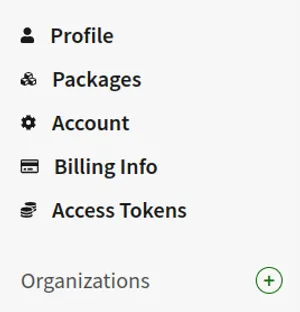
- After logging in, go to the avatar and click on “Packages”, as your account was recently created it’s expected that there is no package
- To create a package, click on the ”+” icon, next to “Organizations”
- Then choose a unique name referring to your organization or set of libraries, ideally it should be small, without special characters and lowercase, since it will be the prefix of your libs (Ex: If the organization is myorg and the library mylib, would look like this @myorg/mylib)
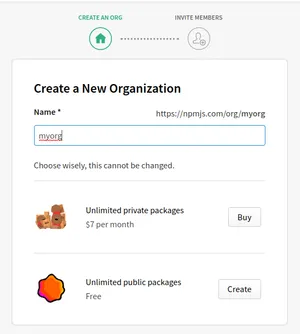
- By clicking on “Create”, npm will validate if this name is available, and if it is, it will create the organization
Creating the project
Start by creating a package.json file at the project root with the following command:
npm init -ySetting up the monorepo
Since the goal is to work with multiple packages, let’s start by installing turborepo, which is a monorepos manager:
npm i -D turborepo@latestAfter installation create a turbo.json file with the following content:
{ "$schema": "https://turborepo.org/schema.json", "pipeline": { "bundle": { "dependsOn": ["^bundle"], "outputs": ["dist/**"] } }}Now create a /libs folder in your project. And then update the package.json declaring this folder in the workspaces attribute.
{ ... "workspaces": [ "libs/*" ], "scripts" : { "bundle": "turbo run bundle" } ...}Creating a library
Configuring the library’s package.json
Create a library folder (eg libs/mylib) and inside it create a package.json file according to the definitions below.
In order for the lib to be published correctly, it is necessary to add some reference information:
- name - Name of the lib (starting with the name of the organization)
- version - Lib version (Do not change manually)
- description - Description of the lib function
- private - Whether this project is publishable or not (Always true)
- licence - License to use
- main - Main lib file name
- types - Types file name
- module - ECMAScript modules file name
- files - Array of files to be added in addition to those described above
- publishConfig - Publish settings (publish registry)
- repository - Address of the code repository
- keywords - Lib keywords
{ "name": "@<org>/<name>", "version": "0.0.0", "description": "<description>", "private": false, "license": "MIT", "main": "dist/index.js", "types": "dist/index.d.ts", "module": "dist/index.mjs", "files": ["dist/"], "publishConfig": { "access": "public", "registry": "https://registry.npmjs.org/" }, "repository": { "type": "git", "url": "<http-url>.git" }, "keywords": ["<keywords>"]}Configuring the library bundler
In the terminal go to your lib path and install tsup, which is a bundler that will compile your code to a publishable structure:
npm i -D tsup esbuild-node-externalsturborepo will possibly add these libs to the /node_modules of the project root, so don’t be surprised if it hasn’t been created. After installation, go to your library’s package.json and add the script:
{ ... "scripts" : { "bundle": "tsup" } ...}This command will be referenced by the turbo run bundle defined at the root package.json and turbo.json, so whenever there is an equal command in the libraries, it will also be executed in parallel.
Finally, create a file in the library called tsup.config.ts and place the following content:
import { defineConfig } from "tsup";import { nodeExternalsPlugin } from "esbuild-node-externals";
defineConfig({  entry = ["src/index.ts"],  platform: "node",  format: ["cjs", "esm"],  splitting: false,  sourcemap: true,  clean: true,  dts: true,  esbuildPlugins: [nodeExternalsPlugin()],});
Now in the library we can create a src/index.ts file, that will be the entry point for the compilation, which will be executed in the project root with the command:
npm run bundleConfiguring version control to publish
To manage versioning, publishing and creating/updating the CHANGELOG.md files, we will use changeset. Then run the following command in the project root:
npm install @changesets/cli && npx changeset initThis command will install the CLI and create the .changeset/ folder, which will serve as a configuration and centralization of files of declared changes to be applied.
Then in the package.json of the project root add the following commands:
{ ... "scripts" : { "bundle": "turbo run bundle", "change": "changeset", "promote": "changeset version", "publish": "changeset publish", } ...}Change
Uses the folder created by npx changeset init to declare a new version, but not by updating the version, it just creates a markdown file with whatever is described. These files are generated with random names so that they can be merged by different people.
-
First it asks to select the libraries that will be updated:
-
Then it asks you to define whether the change is major or minor, and automatically selects patch if any of them do not fit into these categories:

-
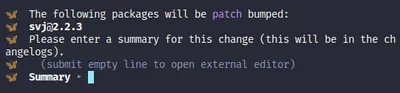
The last step is to add the changes description:
-
Now the previously mentioned file will be created:
---"svj": patch---change description
Promote
Uses the previously generated version declaration file to promote the library version and create or update the CHANGELOG.md:
## 2.2.4
### Patch Changes
- change description
## 2.2.3
...
Publish
After declaring the changes and promoting the libs version, we are ready to publish the lib. The first step is to authenticate to the npm registry. To do this, run the following command:
npm loginIt will ask you to type username, password and email. And it will probably send you an email with a temporary password (OTP) to confirm authentication.
Once authenticated, make sure the code is compiled and run the publish command:
npm run publishAnd that’s it, you’re done!!!